 |
i started this blog as a way to share my garden, the food i cook from the garden, with more people. i feel like now is a good time, the end of summer, to show-off this years veg plot at the height of its glory. i started this plot in march of this year, creating the raised beds with recycled scaffolding boards. a friend of mine found a great source for them at a .50 cent a foot for damaged or unusable boards. these were cut to shape, with a jig saw and screwed together with a bit of galvi-band. the finish on the boards is with an outdoor mahgony coloured furniture stain, which i've used on everything stainable, veg crates, doors, garden furniture, you name it. after that we (me, my other half and 4 friends) filled the beds with a third topsoil, then another third with really old sheep manure (a thoughtful gift from friends of mine!), then the top third with compost from the local recycling center, in bandon. it worked out at 40 euro for all the compost. all in all the beds cost around 80 euro to fill and build. not bad.
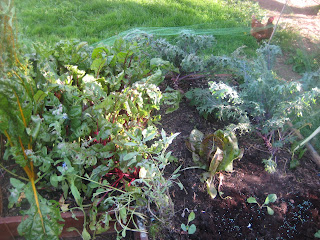 |
| clockwise , beetroot and rainbow chard, red russian kale plants |
 |
| old spud patch (they grew 6foot long) |
i was inspired by joy larcom's book, Creative Vegetable Gardening (see side bar), for my garden design and all of my planting scheme. i wanted to create a small space within the garden to be able to use for entertaining, eating and enjoying the garden. i went for a square 'C' shape, with a willow arch over the entrance. its my favourite garden i've had in the dozen or so i've created in the past. from joy's book i tried to add intrest by interplanting different textures and colours of plants and planting crops on the diagonal instead of straight lines.
 |
| purple sprouting, and red russian kale |
 |
| leeks, seeding radishes, and squash, lots of nasturtiums |
i didn't actually want or need this garden to meet my eating needs throughout the year, i dont have time to grow all that veg! but rather to just be able to grow the interesting veg i want, enjoy the process of growing them and create an outdoor space to be in. and to my surprise i've had loads of veg, almost more than i need! since the begining of the lettuce season the beds have been giving me loads of choice: from beetroot, to romanesco, spuds, mangetout, onions, courgette, beans, chard, celery, lettuce, herbs, and loads of sweet peas - and theres even more to come!
 |
| celery, courgette(front corner), celeriac, beetroot and chard |
 |
| more purple sprouting, asparagus, purple beans, celery |
being a working person i've found this size garden to be the best for the spare time i have and my food needs. it clocks in at about 175 square feet, 58 square meters. i also have 3 beds in a friends polytunnel, which is well enough for tomatoes, aubergine and a couple squash plants.
 |
| front right corner, with courgette bush in foreground and celeriac plants, sweet peas are now 7 feet tall on arch and blooming constantly |
my garden is located just across the lawn from our kitchen window. its a joy to look outside everyday and see how the plants are faring, they've held through in a couple storms and produced as much veg as i could have hoped for with the little sun we've been afforded. when theres no food in the house i can pop outside and see whats on offer, and always have a tasty healthy meal. its probably the best thing about veg gardening, you can always eat something out there!
 |
| the spuds that came from the spud patch, 4' x 7' produced all these happy potatoes, i planted a blight resistant variety, 'sarpo mira' an early maincrop |
i chose a no knead bread recipe because - lets face it- we are all lazy. especially when it comes to bread making. to many of us kneading dough springs to mind, then rising, then not knowing when it will rise depending on room temperatures. it can seem more like a chore to most people, so opting for the quick and simple soda breads for their gluten needs. this recipe, will at least take one step out of the equation. i encourage you to make the biga preferment the night before, this will make all the effort more worth it, it only takes 30 seconds to do. your bread will last longer and taste that much better by starting the biga. and since your skipping the kneading step, you have no excuse to skip the biga!
 |
| the bread after an overnight rise in the fridge, the texture was amazing and had springy open crumb. |
 |
| flour, water, yeast and overnight rise = added flavour |
 |
| Biga = flour, water and yeast |
______________________________________________________
No-Knead Focaccia Loaf with Garden Herbs
Makes 2 flat loaves or 1 bread tin loaf
recipe adapted from: Cook's Illustrated Magazine, Issue 106, October 2010
with my final loaf - the best of the two - after shaping and placing in bread tin, i let it rise overnight and baked the previous morning. this makes the recipe take a day and a half! dont feel pressured to do the overnight rise. this recipe makes a fine loaf after it shaped and allowed to rise for ten minutes in the tin. i like to make the biga around 8pm, then the next day start the dough at around 6pm so its done by 9pm, or the next morning (if rising overnight in the fridge.)
Biga:
1/2 cup (2 1/2 oz) plain flour
1/2 cup (2 2/3 oz) water
1/4 teaspoon instant yeast
Dough:
2 1/2 cups (12 1/2 oz) plain flour
1 1/4 cups (10 oz) warm water, body temp
1 teaspoon instant yeast
2 teaspoons sea salt, plus more for topping
4 tablespoons rapeseed oil (or olive oil)
4 tablespoons chopped garden herbs: thyme, chives, rosemary, oregano
For the Biga:
- mix flour, water and yeast in a medium mixing bowl. mix for about 30 seconds, till all the flour is moistened. cover with cling film, and let rise at room temp for at least 8 hours and up to 24 hours.
 |
| mixing |
 |
| autolysis |
 |
| 'folding' dough with spatula |
For the Dough:
- stir flour water and yeast into your biga mixture. stir for around a minute till flour is moistened, cover in cling film and let sit for 15 minutes. (this is called 'autolysis', which allows the flour to drink up more moisture, before adding the salt.)
- sprinkle salt over the dough, stir with wooden spoon till completely mixed in, about 30 seconds. cover in cling film, let rise for 30 minutes.
- using a rubber spatula or wooden spoon, 'fold' the dough over itself. starting from the bottom and lifting over itself, do this 8 times turning your bowl a quarter turn after each fold. cover again with cling film, and repeat this process 2 more times after a 30 minute rest between folds.
- preheat oven to 220 C or 450 F (if baking same day)
- after third folding, let rise for 30 mintues again. on a floured worktop, divide dough if making two flat loaves, or keep whole if making one large loaf in a tin. for flat loaves shape into rounds and place in 2 oiled cake tins, flip over so the whole dough is oiled. stretch, sprinkle with herbs , let rest for 10 mintues. for large loaf, shape into a log and place in loaf tin, flip, and sprinkle with herbs.
- if baking later: rest dough in the fridge covered in cling film, for 8 hours or over night. the dough should double to triple in size


- when ready to bake, sprinkle loaves with sea salt, then place in hot oven, and bake for 20-25 minutes till golden brown. remove from tins after 5 minutes and cool on a rack befoe eating.
 |
| flat focaccia loaf baked after a final 10 minute rise, notice the difference in crumb (compared to pic above with an over night rise) |
yum yum
ReplyDelete